Author Archives: admin

Making the YouTube UI Step-By-Step

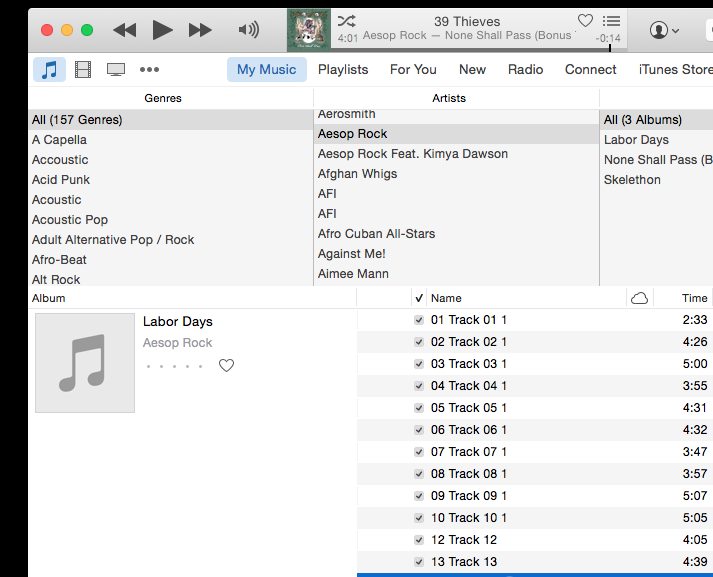
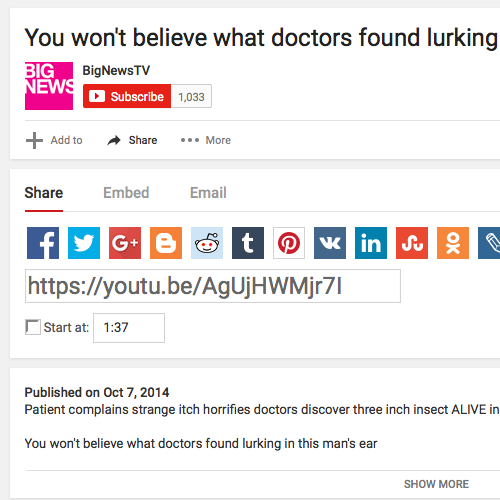
In this tutorial, I’ll show you step-by-step how to recreate the YouTube user interface using HTML and CSS. When we’re done, we’ll have a dynamic web page that looks like the screenshot below that’s ready to be turned into a genuine web application.

Step One:
Start by creating a blank HTML document. Here’s an example. It’s blank, so you won’t see anything, but take a look at the source code to see how to get started on creating an web page.
Check it out!

Step Two:
Now create the images and text elements that you’ll need for the user interface. Start by cutting out the images from the screen shot above. On a Mac, use the command (SHIFT + COMMAND + 4); here is how you do it on Windows.
Check it out!

Step Three:
Once you have all of the necessary images ready, start thinking about where the different <div>s need to go? What should be inside of what? How is the fundamental page architecture set up? In the link below, I’ve set up a preview using a translucent blue background to illustrate how the different <div>s are nested inside of each other. Don’t forget to check out the source code!
Check it out!

Step Four:
Once you’ve got your basic HTML in place, it’s time to start writing your CSS. You can begin by setting some basic styles like the font sizes and background colors for the different elements on the page. This is a great time to give all of your different <div>s classes that you can use to assign them styles from your CSS.
Check it out!

Step Four:
You’re almost there! You just need to add some more styles to your CSS. Give your elements heights and widths, padding, margins and borders, and watch it come to life!
And Presto Chango!


Making the iTunes UI Step-By-Step

In this tutorial, I’ll show you step-by-step how to recreate the iTunes user interface using HTML and CSS.  When we’re done, we’ll have a dynamic web page that looks like the screenshot below that’s ready to be turned into a genuine web application.

Step One:
In addition to all of the text above, there are also lots of images incorporated into the user interface. Start by cutting them out. You can do that by taking screen shots of the design above – on a Mac, use the command (SHIFT + COMMAND + 4); here is how you do it on Windows.
Check it out!

Step Two:
Once you have all of the necessary images ready, start thinking about where the different <div>s need to go? What should be inside of what? How is the fundamental page architecture set up? In the link below, I’ve set up a preview using a translucent blue background to illustrate how the different <div>s are nested inside of each other. Don’t forget to check out the source code!
Check it out!

Step Three:
Once you’ve got your basic HTML in place, it’s time to start writing your CSS. You can begin by setting some basic styles like the font sizes and background colors for the different elements on the page. This is a great time to give all of your different <div>s classes that you can use to assign them styles from your CSS.
Check it out!

Step Four:
You’re almost there! You just need to add some more styles to your CSS. Give your elements heights and widths, padding, margins and borders, and watch it come to life!
And Presto Chango!


404 – admin-ajax.php – shared hosting

PROBLEM:
Like any modern web platform, much of how the WordPress interface communicates with the server is through AJAX commands, which are directed to wp-admin/admin-ajax.php. On a recent install of WordPress, these POST requests were all returning as 404s, disabling much of WordPress. Here’s what I did to fix that and get the site working.

Today, I’ve been setting up a website for a local nonprofit in my community. Since it’s a small site that isn’t likely to get a ton of traffic, I decided to run it on the shared hosting plan that I have through A Small Orange – https://asmallorange.com/

On my first attempt to set up the site, I downloaded the package latest.zip from WordPress.org and uploaded it to a subdomain that I set up on on the shared hosting server. I then ran the install wizard to set up the site. Everything seemed to be working okay, until I began inputting content and found that while Post Back requests were working fine, the AJAX requests were all returning 404s. This meant that much of the site’s basic functionality, including customizing the theme, adding media and managing posts and pages wouldn’t work.

After scratching my head for a while, trying everything I could find through Googling and chatting with tech support for my hosting provider, I was at a loss.

SOLUTION:
After striking out at every attempt I made to remedy the problem, I knew I had to re-install WordPress on the server. But it seemed likely that if I followed the same approach that I had earlier, I would get similar results and face the same 404 problem yet again. So I needed another way to go about installing WordPress.

So I logged into the hosting provider’s cPanel interface and ran the WordPress Install Script from the Softaculous component. And it worked! I believe this would also work if your cPanel is configured with script.aculo.us.

Who knows why. Perhaps Softaculous set the permissions for the files differently than when I’d uploaded them directly, or maybe it configured Apache differently, but who cares. The thing works now. And hopefully this will help you too!